
SSO Integrations
Single Sign-On (SSO) Integrations
Solidarity Tech provides Single Sign-On (SSO) functionality that allows your users to log into external services using their Solidarity Tech account. This centralized authentication system ensures that all users accessing your integrated services have verified Person records in Solidarity Tech, complete with phone numbers and other important attributes.
Benefits of SSO Integration
- Verified Identity: All users must have a verified phone number and Person record in Solidarity Tech
- Spam Prevention: Phone number verification helps prevent spam and inflammatory messages
- Attribute-Based Access: Grant special permissions based on Solidarity Tech attributes (e.g., dues-payer status)
- Centralized Management: Manage user access across multiple services from one dashboard
- Security: Users authenticate through Solidarity Tech's secure phone-based verification system
How SSO Works
When users try to access your integrated service:
- They are redirected to your Solidarity Tech login page
- They enter their phone number
- If an account exists, they receive a 6-digit SMS code
- After successful verification, they are redirected back to your service in the "logged in" state
- Your service receives user data including dues-payer status and other Person record information
Getting Started
- Navigate to Settings → Integrations → SSO in your Solidarity Tech dashboard
- Click Add Integration and select your desired service type
- Follow the configuration steps for your chosen integration
- Test the integration to ensure it's working properly
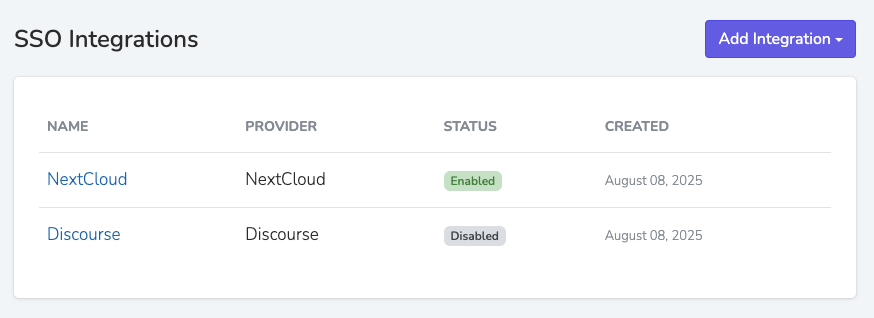
Discourse SSO Integration
Integrate your Discourse forum with Solidarity Tech to ensure all forum participants are verified members with known identities. This integration is perfect for community forums where you want to prevent spam and tie forum access to membership status.
Setup Steps
-
Create Discourse Integration
- In your Solidarity Tech dashboard, navigate to Settings → Integrations → SSO
- Click Add Integration and select Discourse
- Enter a name for this integration (e.g., "Community Forum")
- Enter your Discourse forum URL (e.g.,
https://forum.yourorganization.com) - Copy the automatically generated Connect Secret - you'll need this for step 2
- Click Save Integration
-
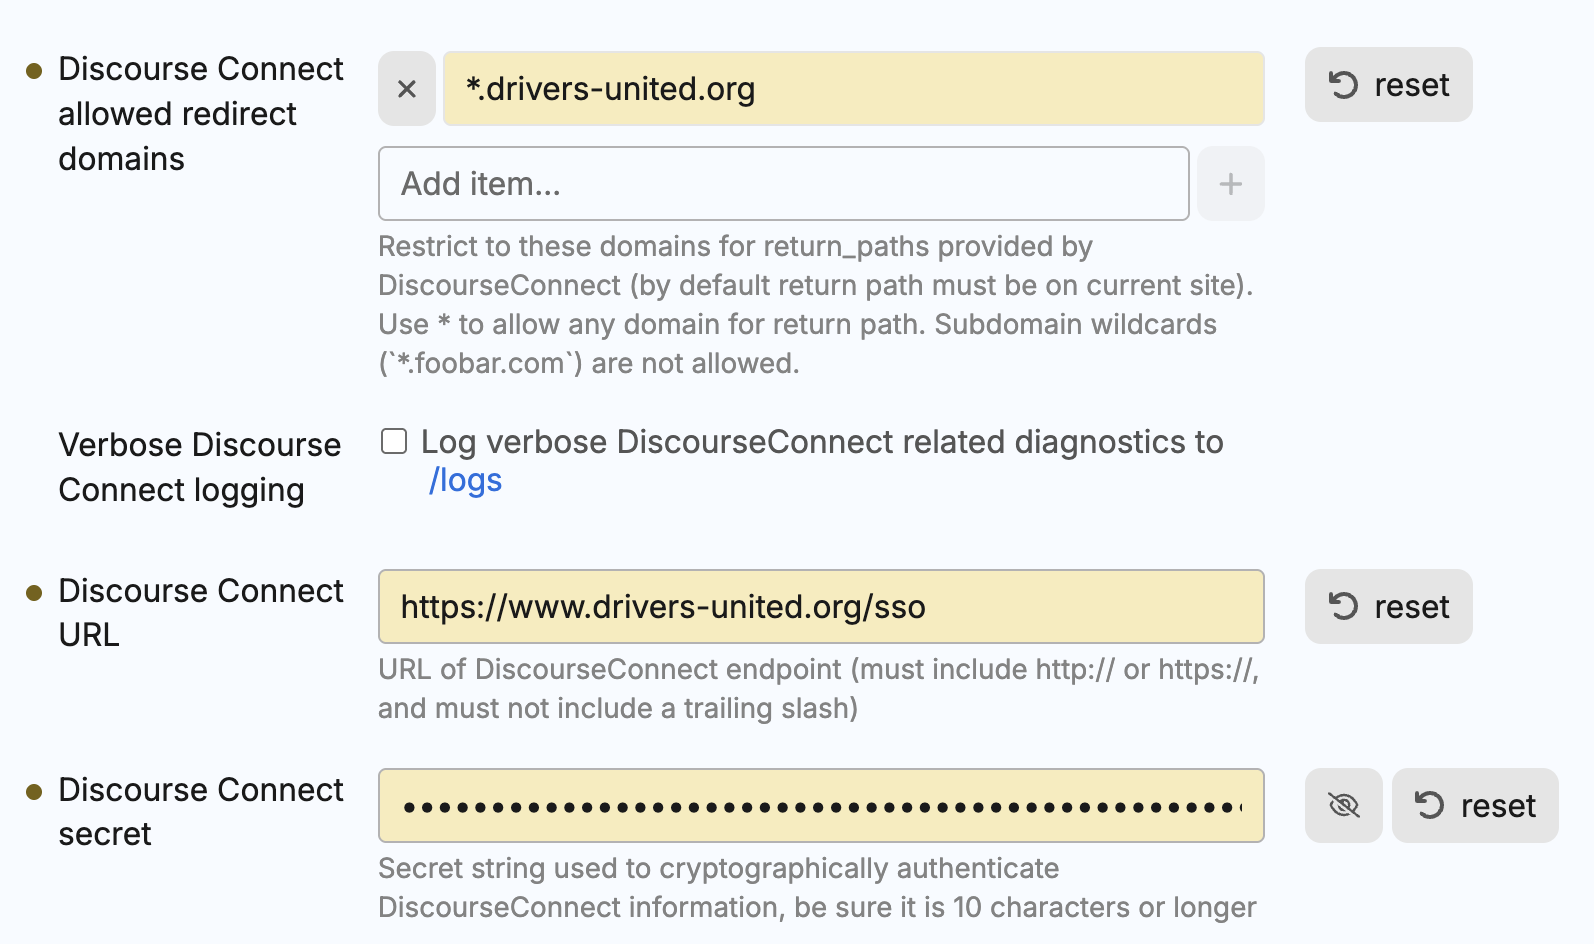
Configure Discourse Server
- Log into your Discourse server as an administrator
- Navigate to Admin → Settings → Login
- Configure these settings:
- enable discourse connect: ✅ Enable this setting
- discourse connect url:
https://your-solidarity-tech-domain.com/sso/[integration-id] - discourse connect secret: Paste the Connect Secret from your Solidarity Tech dashboard
- Test the Integration
- Log out of your Discourse forum
- Try to log in - you should be redirected to Solidarity Tech
- Complete the phone verification process
- Verify you're redirected back to Discourse and logged in
What Users Experience
When users visit your Discourse forum, they click "Log In" and are redirected to Solidarity Tech for phone verification. After verification, they're automatically logged into Discourse with their profile populated from their Solidarity Tech information.
User Data Provided
Discourse receives:
- Username: Based on user's name from Solidarity Tech
- Email: User's verified email address
- Name: Full name from Person record
- Dues Payer Status: For granting special badges or access to private categories
- Organization: User's organization name
NextCloud SAML SSO Integration
Integrate your NextCloud instance with Solidarity Tech using SAML 2.0 for secure single sign-on. This integration is ideal for file sharing and collaboration platforms that need verified user access.
Setup Steps
-
Create NextCloud Integration
- In your Solidarity Tech dashboard, navigate to Settings → Integrations → SSO
- Click Add Integration and select NextCloud
- Enter a name for this integration (e.g., "File Server")
- Enter your NextCloud URL (e.g.,
https://cloud.yourorganization.com) - Click Generate Certificate to create the required SAML certificate
- Copy the generated certificate text - you'll need this for NextCloud configuration
- Click Save Integration
-
Configure NextCloud SAML Settings
- Log into NextCloud as an administrator
- Go to Settings → Administration → SAML/SSO integration
- Enable Use built-in SAML authentication
- Configure Service Provider Data:
- Identifier of the IdP entity:
https://your-solidarity-tech-domain.com/sso/saml/metadata/[integration-id] - URL Target of the IdP:
https://your-solidarity-tech-domain.com/sso/saml/sso/[integration-id] - URL Location of SLO Endpoint:
https://your-solidarity-tech-domain.com/sso/saml/slo/[integration-id] - Public X.509 certificate: Paste the certificate from your Solidarity Tech dashboard
- Identifier of the IdP entity:
- Configure Attribute Mapping:
- Identifier:
uid - Display name:
displayName - Email address:
email
- Identifier:

- Test the Integration
- Log out of NextCloud
- Visit your NextCloud URL
- Click "Log in with SAML" to be redirected to Solidarity Tech
- Complete phone verification and confirm you're logged into NextCloud
What Users Experience
Users visit your NextCloud URL, click "Log in with SAML", get redirected to Solidarity Tech for phone verification, then are automatically logged into NextCloud with their profile populated.
User Data Provided
NextCloud receives comprehensive user data through SAML attributes:
Standard SAML Attributes
- uid: Unique user ID from Solidarity Tech
- displayName: User's full name
- email: Verified email address
- groups: Automatically includes
dues_payersgroup for active members
Extended User Data (prefixed with st_)
st_)All Person record data is available as SAML attributes with the st_ prefix:
Personal Information:
st_first_name,st_last_name- Individual name componentsst_phone_number- Verified phone numberst_username- Unique username in Solidarity Techst_preferred_language- User's language preferencest_timezone- User's timezone setting
Address & Location:
st_address1,st_address2- Street addressst_city,st_state,st_zip_code- Location detailsst_country- Country code
Organization & Membership:
st_organization_name- User's organizationst_chapter- Chapter/local group namest_classification- Member classification levelst_assessment- Member assessment statusst_dues_payer- Boolean indicating active membershipst_paid_dues_since,st_paid_dues_expires_at- Membership datesst_member_since- When they joined (formatted date)
Contact Preferences:
st_sms_permission- Can receive text messagesst_email_permission- Can receive emailsst_call_permission- Can receive phone callsst_peer_to_peer_sms_permission- Can participate in P2P texting
Custom Properties:
- All organization-specific custom user properties are included
- Property names depend on your organization's configuration
Accessing SAML Attributes in NextCloud
Basic Setup: Configure attribute mapping in NextCloud's SAML settings:
- Identifier:
uid - Display name:
displayName - Email address:
email - Groups:
groups
Advanced Usage: Access extended attributes programmatically through NextCloud apps or custom code. All st_* attributes are available in the SAML assertion for conditional access rules, user profile enhancement, or custom integrations.
Group-Based Access: Users with active dues (st_dues_payer = true) are automatically added to the dues_payers group, allowing you to restrict folder access to verified members only.
Custom SSO Integration
Create custom SSO integrations for your own applications or third-party services. This flexible integration allows you to connect any system that can handle HTTP-based authentication.
Setup Steps
-
Create Custom Integration
- In your Solidarity Tech dashboard, navigate to Settings → Integrations → SSO
- Click Add Integration and select Custom
- Enter a name for this integration (e.g., "Member Portal")
- Enter your application's callback URL
- Copy the automatically generated Secret Key - you'll use this to verify requests
- Click Save Integration
-
Implement in Your Application
- When users need to authenticate, redirect them to:
https://your-solidarity-tech-domain.com/sso/[integration-id]?return_url=https://your-app.com/callback - Handle the callback at your return URL where you'll receive user data
- Verify the signature using the Secret Key to ensure authenticity
- Create or update the user session in your application
- When users need to authenticate, redirect them to:
What Users Experience
Users are redirected from your application to Solidarity Tech for phone verification, then redirected back to your application in a logged-in state.
User Data Provided
Your application receives:
- Basic Information: Name, email, phone number
- Dues Payer Status: Boolean indicating active membership
- Organization: User's organization name
- Roles: User permissions and roles
- All Person record data as additional attributes
The data is provided as a signed, base64-encoded payload that you can decode and verify using your Secret Key.