
Plans & Billing
Solidarity Tech pricing is determined by selecting one of three feature plans and a contacts size plan. You can upgrade or downgrade these any time from the dashboard. Upgrading the contact size, rather than paying the overage users fee for surpassed contact size, typically winds up being cheaper.
Usage fees for texts, calls, and emails decrease with the size of the plan. We use Twilio to provision phone numbers, send text messages, and make calls. So as not to discourage organizations from sending the texts and messages they need to send their supporters, we aim to keep the text and call rates as cheap as possible. For the professional plan, text and call costs are as close to at-cost when considering Twilio and variable carrier fees.
The pricing for all feature plan and contact sizes, along with SMS, voice, and email pricing, can be seen on our pricing page. Team Members who have access to manage billing, can view and update the billing plan from the "Plans" section within the Settings tab.
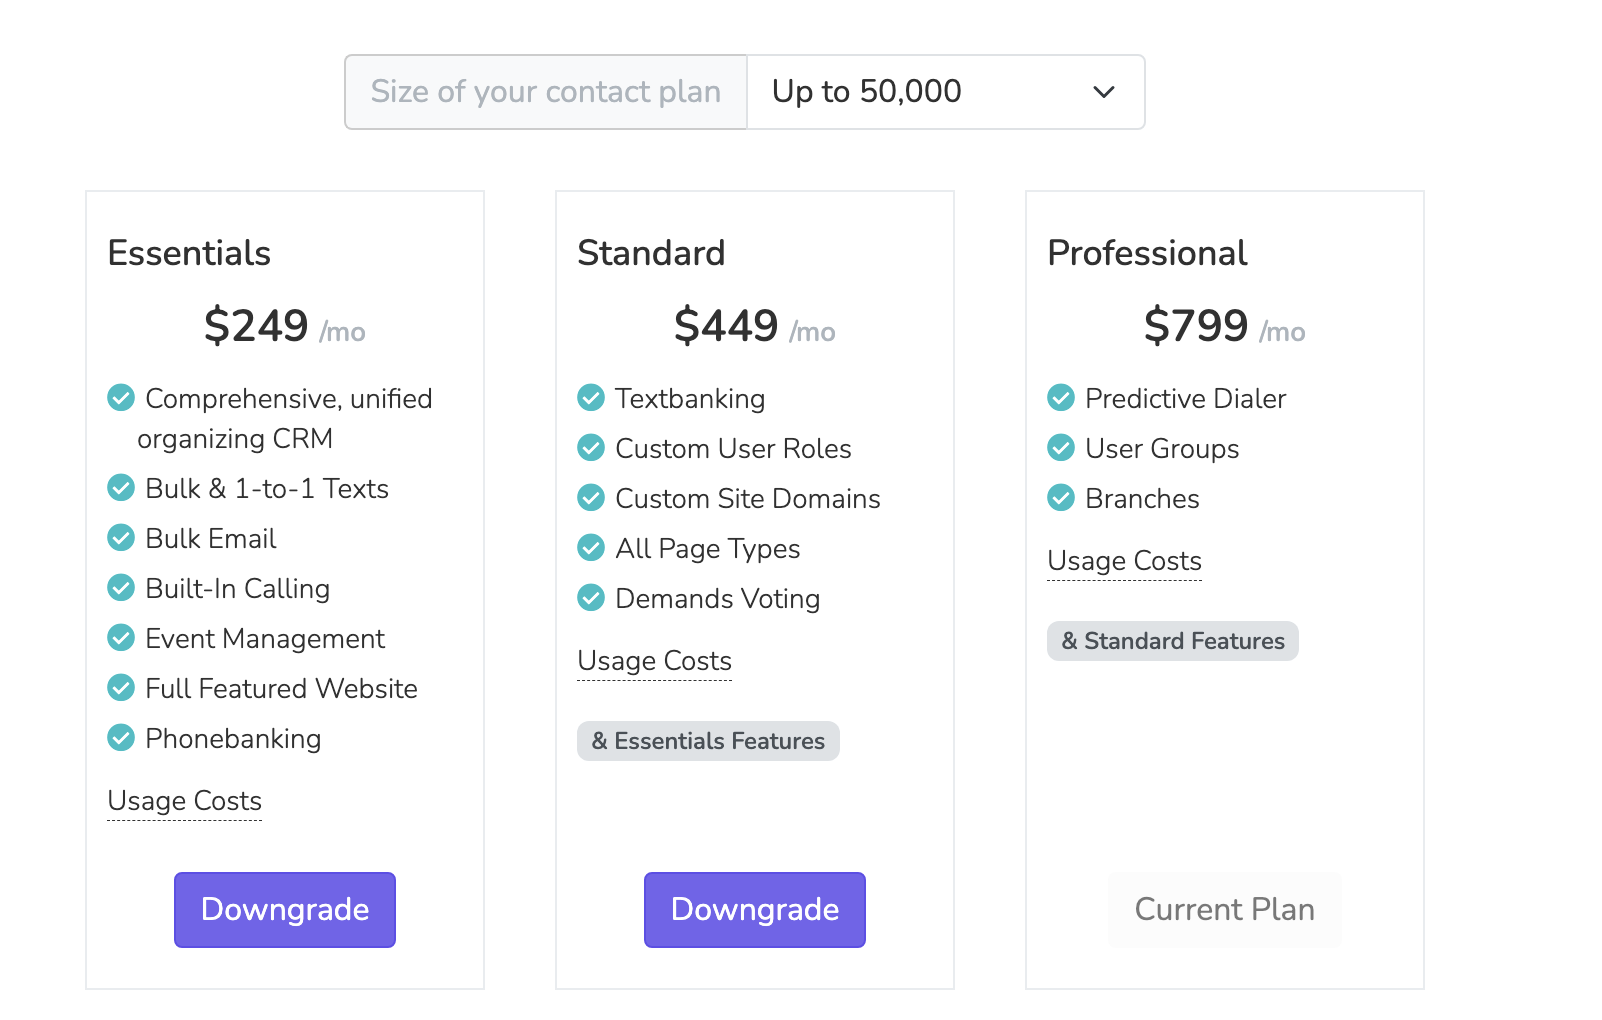
All upgrades will be pro-rated for the month, so you will be billed upfront for the upgrade for the remainder of the billing cycle. Usage rates for SMS, voice, and email will be charged at the rate of the upgraded plan, even if the costs were incurred before the upgrade.
Updating billing method
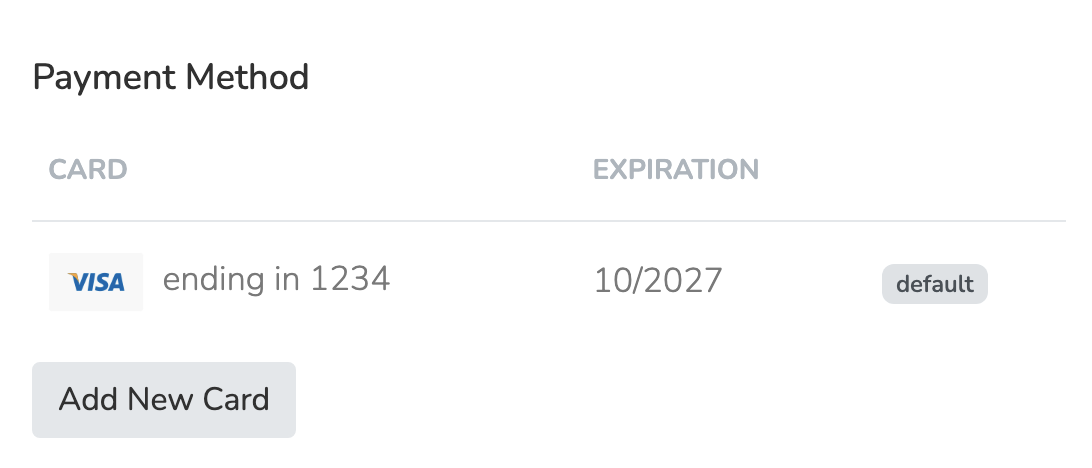
Team Members with access to manage billing can change the default payment method from the "Overview" section of the Settings tab. Solidarity Tech supports two payment methods: Credit/Debit Cards and ACH Bank Accounts.
Credit & Debit Cards
To add a new card:
- Navigate to Settings > Billing > Overview
- Click Add New Card
- Enter your card details and click Add Card
- Optionally check "Make Default Payment Method" to use this card for future invoices
You can add multiple cards and switch between them at any time. To change your default card, click Make Default next to any saved card. Cards cannot be deleted while they are set as the default payment method.
ACH Bank Accounts
ACH (Automated Clearing House) payments allow you to pay invoices directly from your bank account. This is often preferred by organizations as it avoids credit card processing fees and allows for higher payment limits.
Adding a Bank Account
- Navigate to Settings > Billing > Overview
- Scroll down to the ACH Bank Accounts section
- Click Add Bank Account
- Enter the following information:
- Account Holder Name - The name on the bank account
- Routing Number - Your bank's 9-digit routing number
- Account Number - Your bank account number
- Account Holder Type - Select "Individual" for personal accounts or "Company" for business accounts
- Click Add Bank Account
Verifying Your Bank Account
For security, new bank accounts must be verified before they can be used for payments. Stripe uses a micro-deposit verification process:
- After adding your bank account, Stripe will send two small deposits (each under $1.00) to your account within 1-2 business days
- Check your bank statement or online banking to see the exact amounts of these deposits
- Return to Settings > Billing > Overview
- Find your bank account (it will show "Pending Verification" status)
- Click Verify Now
- Enter the two deposit amounts in cents (for example, if you received $0.32 and $0.45, enter "32" and "45")
- Optionally check "Make this my default payment method"
- Click Verify Account
Once verified, your bank account will show a green "Verified" badge and can be used for payments.
Setting ACH as Default
After verification, you can set your bank account as the default payment method:
- Click Make Default next to your verified bank account
- All future invoices will be charged to this bank account
Note: ACH payments typically take 3-5 business days to process. Your invoice will show as "pending" during this time before being marked as paid.
Managing Bank Accounts
- You can add multiple bank accounts to your organization
- Only verified bank accounts can be set as the default payment method
- Bank accounts cannot be deleted while they are set as the default payment method
- To delete a default bank account, first set a different payment method (card or another bank account) as the default
Sub-Organization Billing
Organizations with sub-organizations can optionally allow their sub-organizations to manage their own billing and be charged directly for usage costs. This is useful for larger organizations where each sub-organization (such as regional chapters or locals) wants to pay for their own communication expenses.
How It Works
When sub-organization billing is enabled:
- The root organization continues to pay the monthly base subscription fee (Essentials, Standard, or Professional plan)
- Sub-organizations pay for their own usage costs including:
- Text messages (SMS segments)
- Photo messages (MMS)
- Call minutes
- Phone number fees
- Email sends
Sub-organizations without a valid payment method will have their usage costs included in the root organization's invoice as normal.
Enabling Sub-Organization Billing
Only root organization administrators can enable this feature:
- Navigate to Settings > Structure > Organizations
- Select your root organization
- Check the box labeled "Allow sub-organizations to manage their own billing"
- Click Save
Once enabled, sub-organizations can add their own payment methods and will be charged separately for usage.
Setting Up Billing for a Sub-Organization
Team members with billing access at a sub-organization can add payment methods:
- Log into the dashboard while scoped to the sub-organization
- Navigate to Settings > Billing > Overview
- Add a credit/debit card or ACH bank account (same process as root organization billing)
- Set a billing email address where receipts and payment notifications will be sent
Billing Email
Each sub-organization can set a specific email address for billing communications:
- Receipts for successful payments
- Notifications if a payment fails
- Reminders about unpaid invoices
The root organization administrator will also receive copies of payment failure notifications.
How Invoicing Works
Monthly Invoices
At the start of each billing cycle:
- Sub-organizations with valid payment methods receive usage-only invoices for the previous period
- The root organization receives an invoice for the base subscription fee plus usage for any chapters not covered by sub-organization billing
Invoice titles follow this format:
- Monthly Usage Invoice - [Sub-Org Name] - January 2026
High-Usage Invoices
If a sub-organization's usage exceeds $500 before the regular billing date, an interim invoice is automatically generated and charged. This prevents large bills from accumulating.
Interim invoice titles include the date range:
- Usage Invoice - [Sub-Org Name] - Jan 15-25, 2026
Minimum Invoice Threshold
Invoices under $0.50 are not charged. This small amount will be included in the next billing cycle.
Payment Failures
If a sub-organization's payment fails:
- First attempt fails: Email notification sent to the sub-organization's billing email and the root admin
- Retry attempts: The system automatically retries on days 1, 3, 6, and 9
- Continued failure: The invoice remains unpaid and a banner appears in the dashboard
Important: Unlike root organization billing, sub-organization payment failures do not result in service interruption or deletion of phone numbers. The sub-organization can continue to operate normally while resolving the payment issue.
Viewing Sub-Organization Invoices
- Sub-organization admins can view only their own organization's invoices and payment history
- Root organization admins can view all invoices across all sub-organizations from the main billing overview
Moving Chapters Between Sub-Organizations
If a chapter moves between sub-organizations mid-billing-cycle, its usage will be billed to whichever sub-organization it belongs to at the time of invoice generation.
Closing account
The account owner - the Team Member who initially created the Solidarity Tech Organization - can cancel the account from the "Account" section in Settings tab. Cancelling will immediately end your subscription, and delete your organization at the end of your current billing cycle.
Cancelling your subscription will delete all data - not limited to your websites and pages, your phone numbers and communication history, and your People records. Once you cancel your subscription, you can only reverse the decision until the end of your current billing cycle. Afterwards, the data is permanently deleted.
Updated 6 months ago