
Import People
The bulk importer is the easiest way to import a large number of contacts into your database quickly. You can also manually add contacts one at a time.
To start, open People and click Import, then New import. The Import button needs the Import People permission.
Importing From A File
First, convert your contact data from your spreadsheet or other CRM into a CSV file.
Before You Start
Solidarity Tech pricing is based on the number of contacts and the plan tier. If your import brings your total contact count above the limit of your plan tier, you'll be warned before the import.
Formatting Your File
Ensure that your CSV file meets the following requirements:
- The first row of your CSV file must contain the column headers
- A new contact needs a phone number or an email address, unless you turn off Require Phone or Email
Tip: To update existing records even if their phone or email has changed, include a "Solidarity Tech User ID" column or use a custom property as a primary key (see the Details Step below).
Mapping Fields
After uploading your data, assign each column in the CSV to a field in Solidarity Tech, or skip it. The importer detects common column names like "First Name", "Email", and "Phone Number".
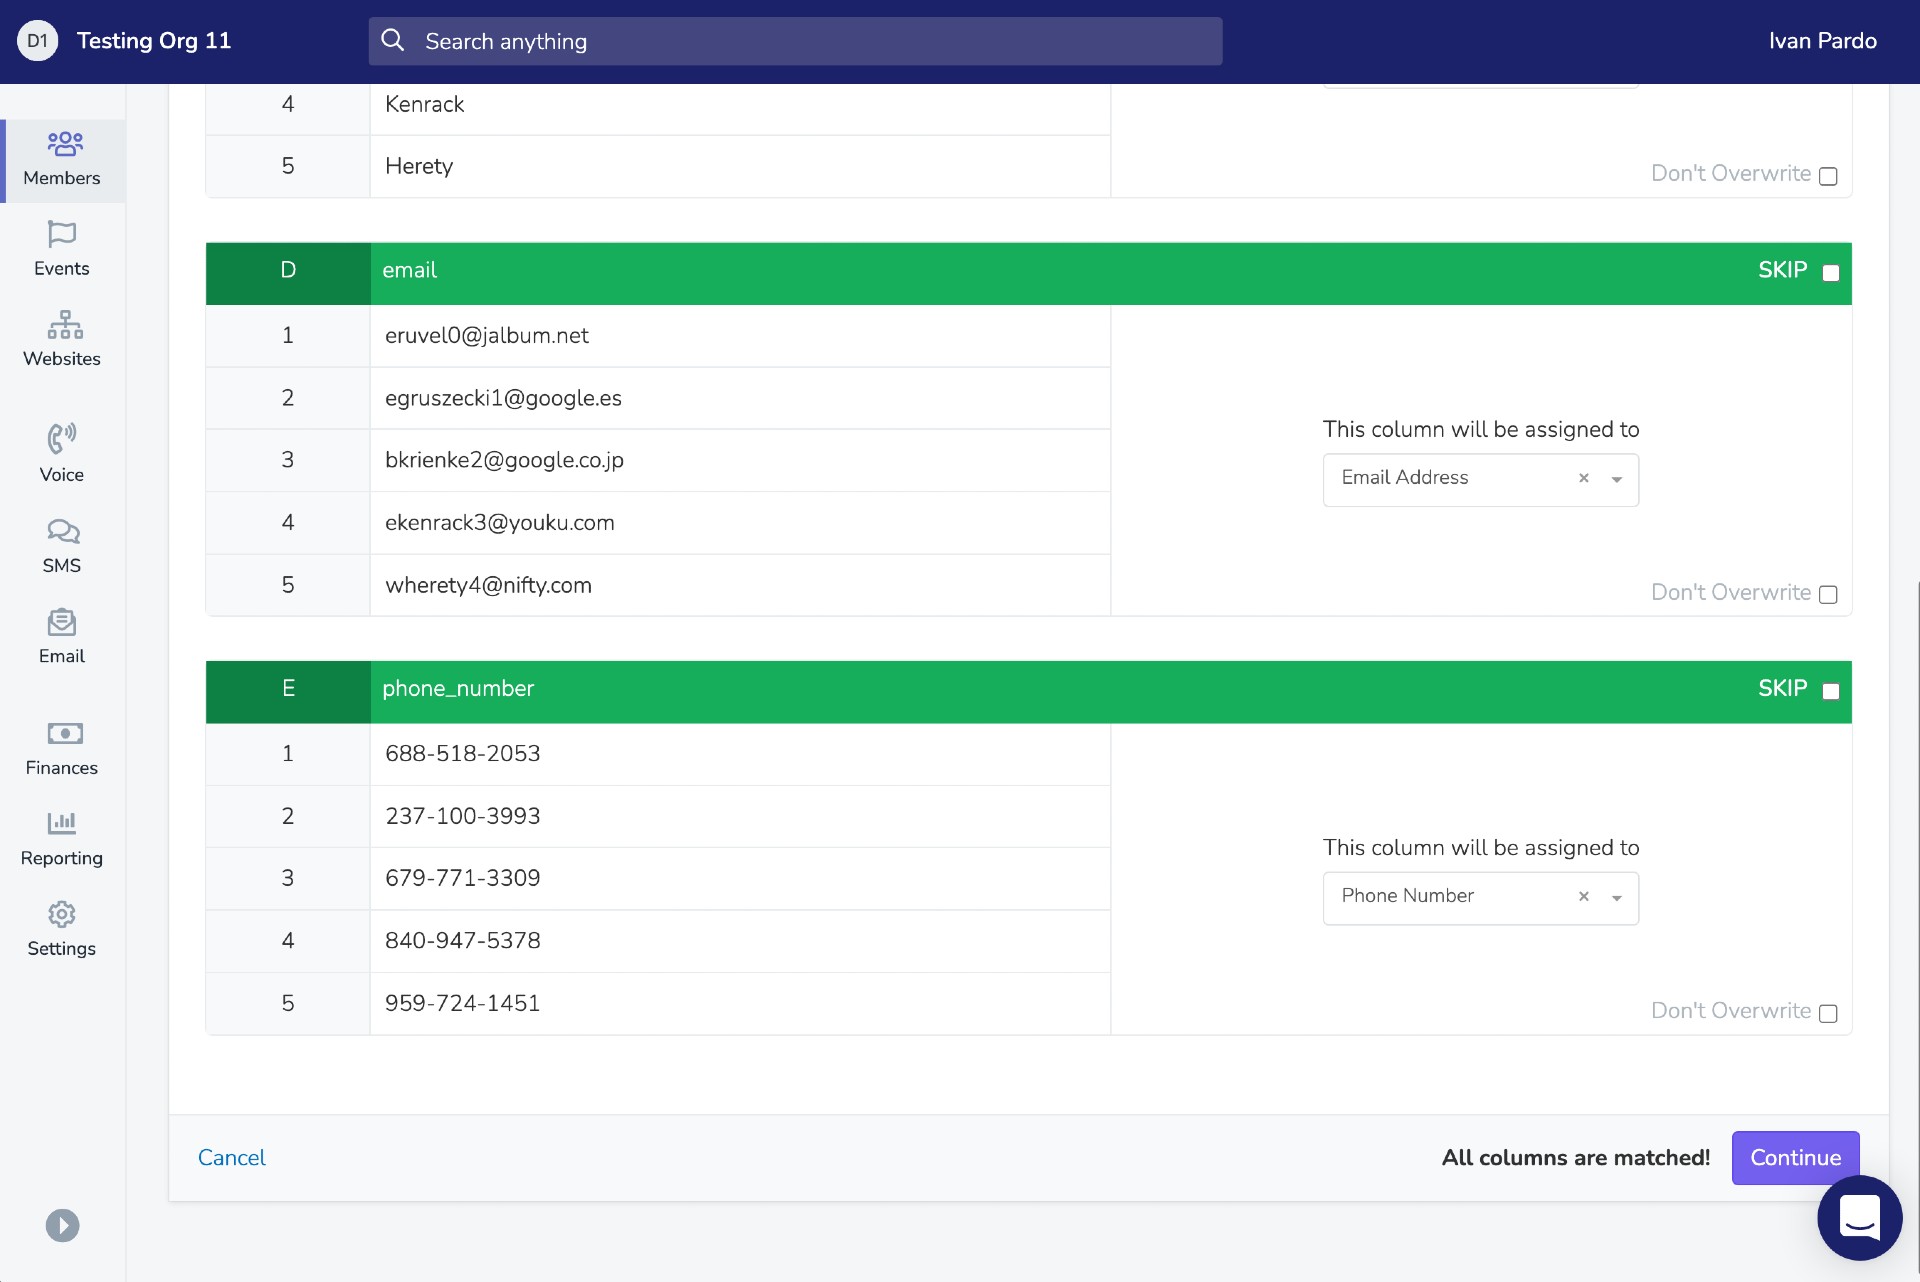
Depending on the field type, a column can have these options:
Don't Overwrite: When checked, the import will only fill in blank fields and won't replace existing values.
Allow new options: For custom properties with options, creates a new option when an imported value matches no existing option.
Add to existing values: For Multiple Checkboxes custom properties, adds imported values to existing selections instead of replacing them.
Field Formats
- Date of Birth:
YYYY-MM-DDorMM/DD/YYYY. - Other Emails: secondary email addresses, separated by semicolons in one cell. You can map only one column to this field. It does not affect the primary email address or email permissions.
- Custom User Properties: use the option value or the label. Separate multiple values with commas, for example
"Volunteer, Donor". For single checkbox fields, use values such asyesorno. Leave the cell blank to keep the current value. - Tags: a comma-separated list. New tags are created automatically.
- Full Address: map an address in a single column (e.g., "123 Main St, Los Angeles, CA 90001") to Full Address, and the importer geocodes it.
Chapter Assignment
On the Upload step, pick a chapter under Chapter Assignment. New people get that chapter, and existing people keep their primary chapter. To set each contact's primary chapter by name, map a column to Primary Chapter.
On the Standard plan or higher, you can also map a column of comma-separated chapter names (e.g., "LA, NYC") to Secondary Chapters.
Advanced Import: Donations, Relationships, and Referrals
Donations: Map Donation Amount and Donation Date (both required). You can also map Donation Source, External Donation ID, Donation Processing Fee, and Donation Note. If you map donation fields, the Details step requires a Donation Source name, such as ActBlue. A Donation Source column can override it for each row. The import skips a duplicate donation.
Relationships: Map Relationship Type (e.g., "Parent" or "Spouse") with Relation Phone Number or Relation Email. The field menu shows these fields only when a column header matches one of them.
Referrals: Map Referrer Phone Number or Referrer Email to record who referred each contact.
The related person and the referrer must already exist in your database.
Details Step
On the final screen before starting the import, you'll configure these settings:
- Default Preferred Language: assigned to imported contacts with no preferred language, if the preferred language field is not mapped.
- Require Phone or Email: enabled by default. It counts only the primary phone number and the primary email. Disable to import contacts without a phone number or email address.
- Add Import Chapter as Secondary for Existing Contacts (Standard, Professional, and Enterprise plans): adds the import chapter as a secondary membership for an existing contact with a different primary chapter. Their primary chapter stays the same.
These settings are under Show Advanced Options:
- Update Existing Contacts: enabled by default. When a contact already exists, the import updates it instead of making a duplicate. Disable to skip records that already exist.
- Use Custom Property as Primary Key: matches existing contacts by a mapped Single-line Text or Number custom property, such as a member ID or external system ID. It appears only when such a property is in your field mapping.
- Allow Landline Phones: enabled by default. Disable to exclude phone numbers that can't receive text messages.
- Assign Tag To All: adds tags to all successfully imported contacts. To filter by this import later, you can also use the "Included in Data Import" filter.
Warning: A custom property used as the primary key must contain unique values for each contact. If multiple contacts share the same value, the import will overwrite data from one contact onto another, and this cannot be undone.
Permissions an Import Turns On
An import gives SMS Blast and SMS P2P permission to a new person whose number can get texts, unless the person opted out.
Preserving Opt-Outs During Import
If you're migrating from another CRM and have people who opted out of communications, you can preserve those preferences directly during import.
Option 1: Map Opt-Out Columns (Recommended)
If your CSV has columns indicating opt-out status (e.g., "SMS Opted Out", "Email Unsubscribed"), you can map them directly:
- Chapter Opt-Out - Revokes permissions for the chapter you're importing to
- Global Opt-Out - Revokes organization-wide permissions (master switch)
After selecting either opt-out option, choose which permission types to revoke: SMS Blast, SMS P2P, Email, or Call.
If the column value is true, yes, 1, or y, the selected permissions will be set to OFF.
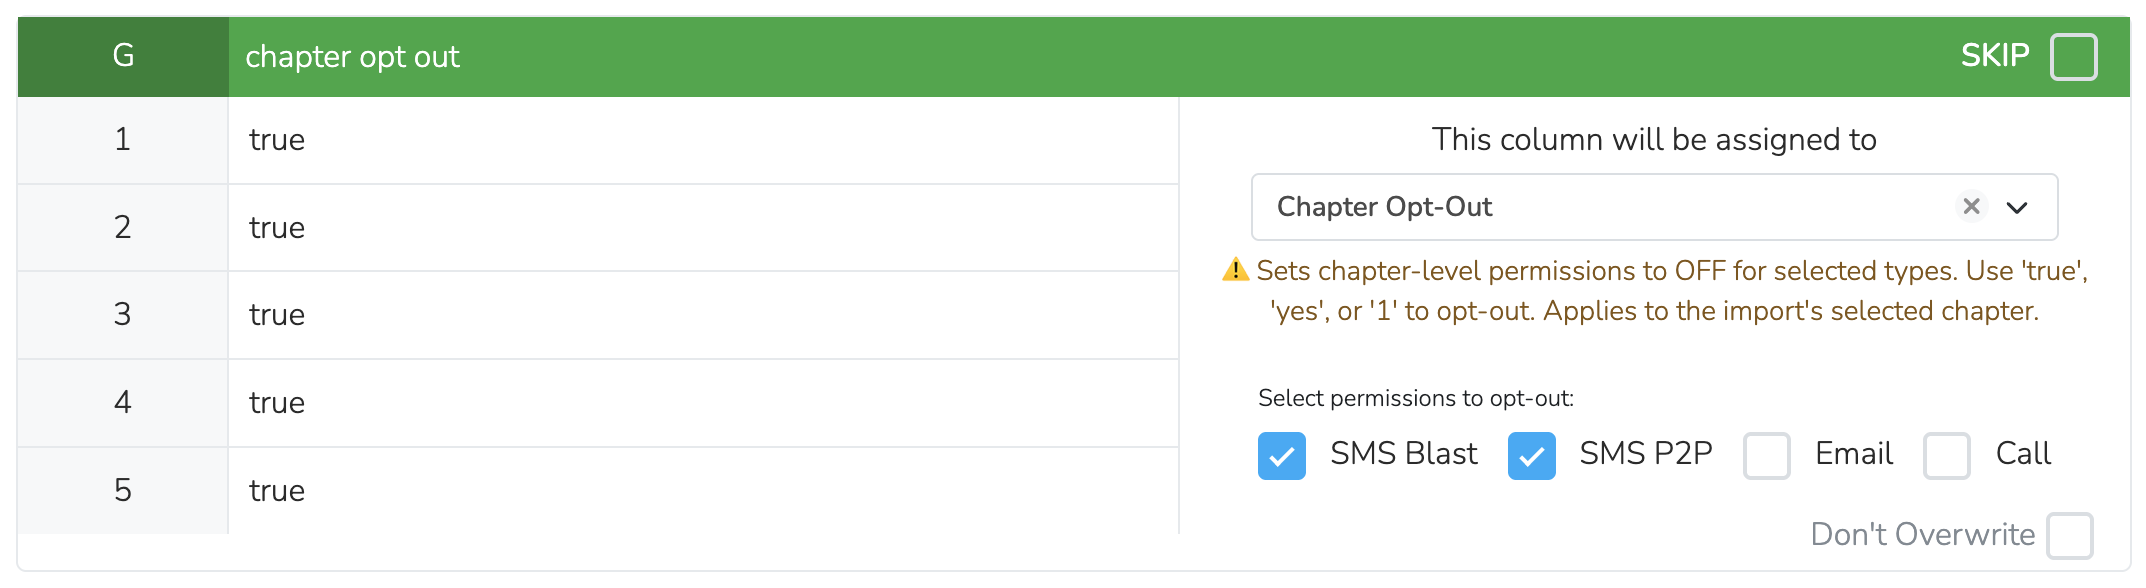
Tip: Use Chapter Opt-Out if people only unsubscribed from a specific location/chapter. Use Global Opt-Out if they unsubscribed from your entire organization.
For more details on how permissions work, see Communication Permissions.
Option 2: Bulk Update After Import
Alternatively, you can opt people out after importing:
- Import everyone (with default opt-in status)
- Import a separate CSV of just the people who should be opted out (with their email or phone)
- Create a filter with Included in Data Import set to your opt-out import.
- Bulk Update → "Opt Out of Communications" → check Opt out of Calls, Opt out of Texts, or Opt out of Emails as needed.
After Import
The Imports page lists each import with the counts Created, Updated, Failed, and All. If any rows failed, you can download an error CSV showing which rows had issues and why.
Updated 2 days ago